AmbiVe
  • What this is
  • AmbiVe on YouTube
  • Featured Vehicles
    • 73' SR240Z >
      • SR240Z Swap Info >
        • My Notes
    • 2JZ 300ZX
    • 67' Mustang
    • 05' AP2 S2000
    • 55' Buick Special
    • Bikes
  • Great Drives
  • Get In Touch
  • What this is
  • AmbiVe on YouTube
  • Featured Vehicles
    • 73' SR240Z >
      • SR240Z Swap Info >
        • My Notes
    • 2JZ 300ZX
    • 67' Mustang
    • 05' AP2 S2000
    • 55' Buick Special
    • Bikes
  • Great Drives
  • Get In Touch

Just a few notes...

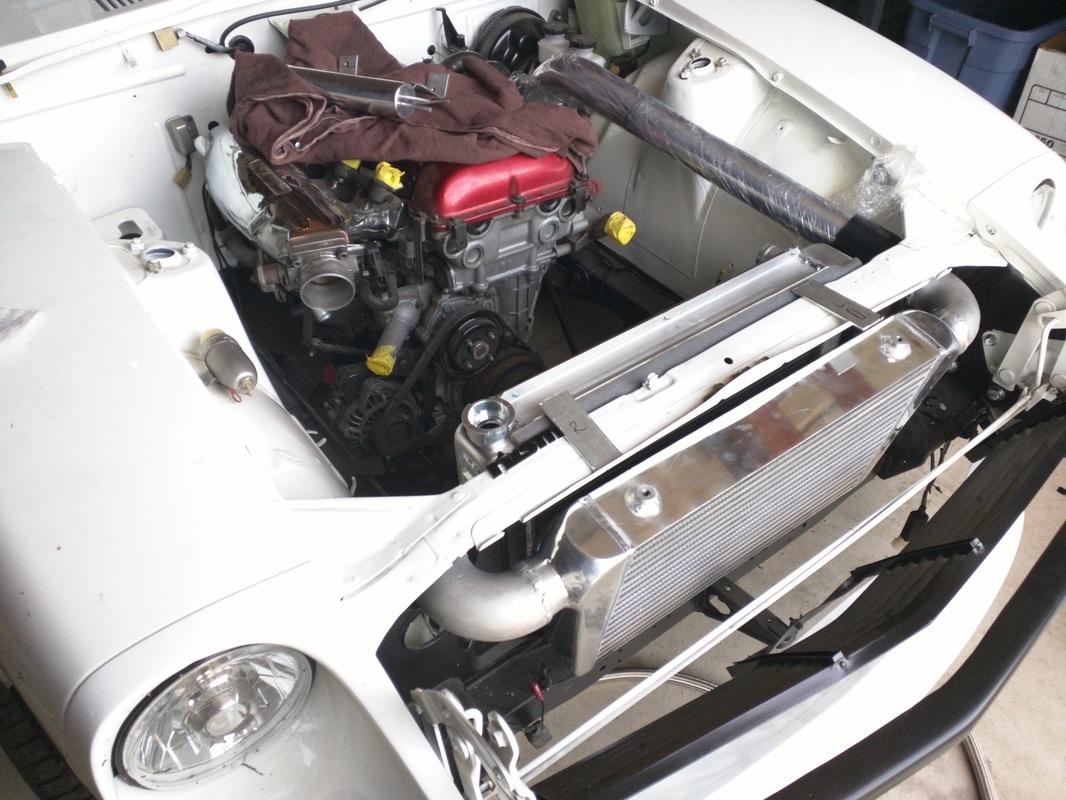
There are a lot of little details involved when you start thinking about completely changing the powertrain of a car with that of a much newer vehicle. I could spend days covering all of them, but I will try to keep updating this list with information I think is particularly good to know or that I think might have a lot of misinformation about coming back from Google. Because this list is so long, there is a quick link index to scroll you to the general area of interest.
  1. Basic SR20DET Info
  2. SR20DET Turbo Variations
  3. Engine & Transmission Mounts
  4. Electrical
  5. Engine Management
  6. Fuel System
  7. Intercoolers
  8. Exhaust
  9. Suspension
  10. Brakes
  11. Gauges
Picture
If you don't see the level of detail you need or think I should include another informational item, send me a message and I'll look at adding it.
 

SR20DET

Learn the SR20DET, become one with it...
SR20DETs are available in several flavors, including different drive train formats, and it can be very confusing. Since it is highly unlikely you would be converting your Z to front wheel drive, we will discuss only the rear wheel drive variants. There are 3 general versions, the S13, S14, and S15. The S13 engine variant came in both a red top and black top (referring to the color of the valve cover paint). These engines are not different in any significant way, but the black top can cause confusion as later generations valve covers were painted black as well.

S13 Red Top: 1991-1993
  • T25G turbo
  • 370cc injectors
  • No VCT (variable cam timing) or VVT or VV anything else.

S13 Black Top: 1994-1998
  • T25G turbo
  • 370cc injectors
  • No VCT (variable cam timing) or VVT or VV anything else.
Differences from later engines:
  • No VCT "bump" on intake side of the rocker cover.
  • No slope on the back of the rocker cover.
  • Low mount intake plenum - the intake plenum sits under the intake runners.

S14 S15 Black Top: 1994-2001
  • Larger T28 turbocharger (changed from journal bearing to ball bearing in 1996)
  • VCT on the inlet cam
  • Revised intake design (high mount plenum chamber).
  • Different loom and ECU design (not interchangeable with earlier models)
  • Different oil filter thread (Ryco filter Z445 vs S13 filter which is a Z442).

There are some less discussed differences that may impact your decision:
  • S13 heads have a theoretically better porting.
  • S14/S15 oil pumps flow more oil (in order to activate VVT).
  • S14/S15 water pumps flow better (can be mated to S13s).
  • In 1996 there was a transition from a journal bearing T28 to a ball bearing T28. Read more about the difference below.

Weak Points
The best way to understand what the engine is capable of is to understand it's weaknesses. The SR20DET has several variations, and each has high points and low points. Assume the weakest link is your own laziness/stupidity and correct this first. Learn everything you can about the engine before you buy it. The most common reason for engine failure is poor maintenance, abuse, or poor tuning. Now that we have that out of the way, here are the most common mechanical weaknesses:

Oil Pickup: Starting with the S13 red top variant, be wary of the oil pickup. The factory oil pick up had a brace welded to the pickup tube for stability. This worked great for holding the tube, unfortunately the head typically fell off the tube and thus drastically reduced it's functionality. The solution is simple, buy and install a later model oil pickup such as that off the S14/S15 variants.

Oil Pan: All SRs have a poorly designed oil pan and oil pickup location. Changing out the oil pan to a larger after market design can be extremely beneficial. Baffling can also help keep the oil near the pickup during hard cornering.

Rocker Arms: The rocker arms are the typical concern in the top end of the engine, but this is generally due to excessive revving of the engine. If the plan for the car involves racing or excessive revving a contested reliability upgrade would be rocker arm stoppers. This point is debated extensively on forums all over the tubes of the internet. In summary, some believe having a plate that can be broken or cause rocker arms to break is worse than letting the rocker arms simply do what they will, where as the counter argument says using something to keep them in check will protect during over revving of the engine. You will need to make up your own mind on this one.

Head Gasket: These engines typically do not have metal head gaskets and do not need them at stock boost pressures. If the boost is being increased a high quality metal head gasket is a good upgrade. At this point it maybe worth upgrade the head bolts to good ARP studs as well, since you are removing the head anyway.

Timing Chain Guide: There is a guide located inside the valve cover. It is bolted so that it covers the top of the timing chain, just above the cam sprockets. This guide can wear down over time and eventually interfere with the chain to cause noise or even break off and fall into the chain. It is suggested that it be removed and the owner simply check the tension of the timing chain from time to time.

Additional weaknesses will depend on the power levels you are attempting to attain. Anything will break if you push it hard enough. These are the common weak points for those seeking a reasonable power level, generally up to around 350 horsepower depending on the quality of parts and tune. Remember, this is a NEWER engine, not a new engine. Expect to do all the basic tune up items you would do on any other car while the engine is accessible.
 

Turbos

Obviously there are multiple variations of turbo in play with the selection of the stock SR20DETs. The differences are not limited to size, but also bearing type. There are also several very common aftermarket turbo options that I have looked into and will compare as well. This is just a brief overview of what I know about the turbo variations and things to consider about each one for your application. Most of this excellent information comes from Scoot over at 240sxforums.com with corrections as I discover them.

S13 Red-Top T25:
Compressor: T-25, 60 trim 56mm 0.80 A/R BCI-1 compressor.
Turbine: T-25, 62 trim 53.8mm 0.64 A/R turbine housing.
Stock Boost: 7 psi
Safe Boost: > 13-15 psi After that The Turbo is past it's efficiency
Max Boost: 17 psi
HP Ratings: 240 - 250 RWHP
Type of Bearings: Journal Bearing

S13 Black-Top T25:
Compressor: T-25, 60 trim 56mm 0.80 A/R BCI-1 compressor.
Turbine: T-25, 62 trim 53.8mm 0.64 A/R turbine housing.
Stock Boost: 7 psi
Safe Boost: > 13-15 psi After that The Turbo is past it's efficiency
Max Boost: 17 psi
HP Ratings: 240 - 250 RWHP
Type of Bearings: Journal Bearing

S14 Zenki (1993-96) Black-Top T28:
Compressor: T-28, 60 trim 60 mm 0.60 A/R BCI-1 compressor in T-04B housing 
Turbine: T-25, 62 trim 53.8mm 0.64 A/R turbine housing. 
Stock Boost: 7 psi
Safe Boost: > 13-15 psi After that The Turbo is past it's efficiency
Max Boost: 17 psi
HP Ratings: 250 - 260 RWHP
Type of Bearings: Journal Bering

S14 Kouki (1996-98) Black-Top T28:
Compressor: T-28, 60 trim 60 mm 0.60 A/R BCI-1 compressor in T-04B housing 
Turbine: T-25, 62 trim 53.8mm 0.64 A/R turbine housing. 
Stock Boost: 7 psi
Safe Boost: > 13-15 psi After that The Turbo is past it's efficiency
Max Boost: 17 psi
HP Ratings: 255 - 265 RWHP
Type of Bearings: Ball Bearing

S15 Black-Top T28:
Compressor: T-28, 60 trim 60 mm 0.60 A/R BCI-1 compressor in T-04B housing 
Turbine: T-25, 62 trim 53.8mm 0.64 A/R turbine housing, Inconel Turbine Wheel. 
Stock Boost: 7 psi
Safe Boost: > 15 - 18 psi After that The Turbo is past it's efficiency
Max Boost: 20 psi
HP Ratings: Approx. 300 RWHP MAX
Type of Bearings: Ball Bearing

N14 GTi-R (1990-94) T28:
Compressor: T3 Super-60, 60 trim 60mm 0.60 A/R BCI-1 compressor.
Turbine: T-25, 79 trim 53.8mm 0.86 A/R turbine housing, Inconel Turbine Wheel.
Stock Boost: 7 psi
Safe Boost: > 13-15 psi After that The Turbo is past it's efficiency
Max Boost: 17 psi
HP Ratings: 290 - 300 RWHP
Type of Bearings: Journal Bearing
Upgrades: Replace compressor Housing w/ S14 T28 and Max RWHP can be bumped up to 320
​
 

​Engine and Transmission Mounts

Just mounting the engine and transmission is a relatively easy process. The first step is to remove the existing mounts from the frame rails. Once you have done this, the rails are ready for you to mount the new engine cradle. You can either buy this (my recommendation) or make it yourself.
There are several places selling engine and transmission mounts for this swap, but there are massive differences in quality. Recently I saw a "kit" used for an SR20DET swapped S30 come into a shop that used straight off the shelf angle iron and horrible square tubing, where multiple cuts were made so that the square tubing could be welded into the U shape required to pass below the engine. This is a crucial structural component. Although simple, the engineering of these pieces is critical. For my personal build I went with McKinney Motorsports kit due to time constraints and reputation. I was not disappointed. The welds and fitment was excellent for my purposes and required no modifications.

Picture
If you are considering making your own I would strongly urge you to spend time on your design and spend money on quality materials. These are the only pieces of hardware to keep your engine and transmission in place and will take the brunt of the torque.
Basic Design
The general design of the mounts is such that the L-shaped ears on the ends rest on top of the S30 frame rails. The mount then has perches for the engine mounts and bushings. This is a pretty traditional style for cars that have easily accessible frame rails as the S30 does. The difficulties are in the placement of the perches for the engine and allowing customization to correct the angle of the engine but not cause weaknesses that will allow the engine to move under heavy power.

Using a single, properly bent, tube as in the picture reduces the chances of weld failure due to torque or vibrations.

Picture
 
Picture
​Bushings
The bushings are simply isolators between the engine/transmission mount and the engine it's self to allow give and tune out vibrations felt by the driver/passengers. These bushings can be used to tune the feel, sound, and performance of the vehicle to some degree. For instance, removing the bushing material completely and mounting the metal engine mount directly to your metal cradle will remove all flexibility and thus give you the most efficient power transfer possible. However, vibrations pass very well through metal. Removing the isolation between the frame of the car and the engine will drastically increase the vibrations felt by the occupants while also increasing the noise.

​Electrical

The right hand drive electrical harnesses on the SR is obviously not directly compatible with a twenty year older left hand drive Z (assuming you are in the US). While it is possible to merge the harness into the existing system, there are really no benefits. The original Z system doesn't have any sort of management system wiring or BCM systems. The easiest solution will be to essentially wire up the new engine as a stand-alone harness that simply draws power from a junction block or similar system but otherwise does not interact with the original (and probably now crappy) 40 year old wiring. This is what I opted for, snagging an STL wiring harness from McKinney Motorsports but after beginning the swap decided to use a Wiring Specialties PRO harness. The McKinney harness was good quality, but we decided we wanted to consolidate wires for things such as the alternator and move the igniter chip into the cabin. You could do this with an OEM SR harness and customization, but that will be a significant amount of work.

While you are digging through the wiring of the Z, it might be a good time to upgrade the headlight system (changing it over to relay systems) and/or marker light systems. There are kits available that reduce the current drawn through the combo switches by adding relay units in-line and allows lights to draw directly from the battery/charging system. You can buy these systems from zcarparts.com or somewhere like datsun-240z-upgrades.net.

I would like to give you more information about specific solutions, but it will be very case dependent. If you are going to be using a standalone system and have the money, you maybe better off to simply go to one of the CAN/BUS systems used by your ECU vendor or a custom harness (for instance Haltech and their CAN system).

Here is a well documented image of the factory harness for those who are interested:
Picture
Before transitioning to the brains of the system, it should be noted you will need to consider how you will integrate with the original body harness for power and a few functions. Here are a few critical wire colors for a 73' 240Z you should know, they may vary in different years:

Back/Yellow Stripe: Ignition, you will need to pull this from the OE harness and connect it to the blade connector on the SR starter.

Green/Yellow Stripe: This is generally lights. Power comes from the engine bay as a main white power feed, then changes to a green wire with a yellow stripe into the dash. This system can be tricky to fully power as the main white line only powers a portion of the circuits used. The hazard switch and steering column stalk interact with 90% of what you need, but you will have to do some specific tracing to get everything including marker lights to work.
 

Engine Management System

The fuel injection/ignition system requires a computer control module to operate as you should probably know by this point. This is a fundamental requirement of the swap, otherwise you will have a very expensive paperweight in your engine bay. In my opinion there are really only two options in this area: use the factory ECU for the SR or a stand alone EMS. I am of the mindset that I want the fewest points of failure possible, so adding a piggy back system that is "fudging" signals to the engine is just necessary complexity and one more potential problem in my mind.

​
Factory ECU
This is going to get you up and running but that is about it. This is the cheapest solution by far with the price completely dependent on where you source the parts and is best suited for people doing very little modification/tuning. Positives of using the OEM ECU (at least in the beginning) includes reliability, simplicity, and ease of trouble shooting. If everything is installed and configured with original parts in the beginning you can follow a basic service manual trouble shooting regime to work out the gremlins. If you believe you have an ECU problem you can simply grab another cheap ECU or borrow one from someone with the same engine for testing.
OEM ECUs are identifiable by a large Nissan sticker in the corner of the top of the ECU (as shown in the image to the right). This number denotes the version of SR20DET the ECU is configured for as well as the intended transmission. These codes are as follows:
​
​​62 = 1991 to 1993 red top with manual transmission.
63 = 1991 to 1993 red top with automatic transmission.
E5 = 1994 to 1996 black top with manual transmission.
J7 = 1997 to 1998 Type-X black top with manual transmission.
Picture
Picture
​​Chipped/Piggyback ECU
In order to tune an OEM ECU the system you will have to either get the ECU flashed/chipped (such as the offerings from JWT or RS-Enthalpy) or get a piggy back system. These options will grant you some modest flexibility and allow you to tune for a different turbo and/or injector pairing, but add cost. For instance, the JWT option will set you back approximately an additional $700. Thus, if you are expecting to do significant tuning you may be better served by jumping to a standalone system. Another consideration is that most piggyback systems will require you to splice into the wiring loom in multiple locations. This means you are increasing the chance of having faulty connections, making mistakes, or damaging equipment. Chipped ECUs are handled by a professional and soldered directly to the ECU boards or using a separate daughter board, making your portion of the install process as simple as plugging it back in.​ An example of this can be seen in the image to the left.
Standalone EMS
This is probably the best option but also the most expensive. Going this route will almost certainly cost a minimum of $1500 using an AEM, Haltech, or the like. Additionally you will be buying sensors that are specific to your goals (converting to MAP, IAT, etc) as well as paying for dyno tuning. It is not unreasonable to expect to spend $2500+ on parts, installation, and tuning. This is why it is important to have a good grasp of your budget and the scope of the project. All the bolt on performance goodies in the world are worthless if you can't afford to properly tune the system. The quality of the tuner is equally important to the equipment. You will need to locate a respectable tuner with access to a dyno and who is familiar with your hardware. Yes, generic maps are available, but in general, they should only be used to get the vehicle to the shop for a proper tune. Even with modification being identical, there are variations from engine to engine and install to install.
Going with a full standalone installation also brings the benefit of advanced visualizations and automation such as Haltech's ESP software or AEM's offerings (they have a lot). These systems bring the benefit of saving multiple maps that are adjustable as needed (no need to ship off an ECU for flashing) and allow for nice visualizations and automated tuning functionality. It also opens the door for remote tuning/tweaking options if you run into issues while on the road and away from your preferred tuning shop.
Picture
 

​The Fuel System

As you may or may not know, the fuel demands of a 1970's era carbureted 6 cylinder are a little different than that of a 1990's turbocharged, fuel injected, 4 cylinder (even beyond the fact you are losing the mechanical fuel pump). There are many ways to address this ranging from just using a Walbro 255 in line to meet the minimum requirements, running two pumps (a high flow/low pressure close to the tank feeding a high pressure closer to the engine), or any assortment of other combinations. The end result is simply to push enough fuel to the fuel rail that the injectors are never wanting, likewise, not push so much that the pressure causes the injectors to leak extra fuel or wear out prematurely. Later S30 cars will likely have an electric fuel pump that was added near the fuel tank. This was done to help alleviate vapor lock in the early cars. While it is possible to use this pump, it should be used in combination with another pump and only after ensuring it is in excellent working condition. Most of those who undertake a swap like this replace the pump as well as a good deal of the wiring to be on the safe side. Unfortunately it will be very difficult to ensure adequate pressure with systems based around an originally carbureted system.

The OEM SR20DET fuel pump is rated at approximately 140 liter per hour. For reference, an OEM 240SX fuel pump is approximately 90-100 lph, the NA 300ZX pumps are about 160 lph and TT pumps 260 lph, and the default go to Walbro 255 should be about 255 lph. All rates are estimates because it can vary greatly from pump to pump, especially between brand name and knockoffs. For example, Walbro 255s are some of the most faked pumps on the market, as a result, there is a lot of misinformation and incorrect reliability assumptions due to people receiving defective knockoff units and believing they were real Walbros.

Fuel Tank Design
Another issue that is a little more advanced is the baffle situation in the fuel tank. Due to the lower fuel demands and the fact the carburetors have their own bowls for fuel reserves, the baffling in the 240Z is woefully inadequate/nonexistent for high performance applications with an SR20DET. When the car changes directions rapidly or holds a sustained high g turn, the fuel pump can starve and thus the engine. Two big problems with this are that it's possible to lock up the fuel system or even worse, cause a devastating lean condition in the engine that may destroy it.
Picture
Surge Tanks
A solution commonly used is to place a surge tank in line with the rest of the fuel system with a pump before and after. This provides a small amount of fuel that is always available for the second pump to pull to the engine in case the first pump is unable to draw fuel from the tank. The theory being that the fuel situation will be resolved before the surge tank runs out.

​Using a surge tank solution also allows for flexibility in pump schema or pressure options. You have options in the pump used to move fuel from the fuel tank/cell to the surge tank as well as options for moving the fuel from the surge tank to the fuel rails. There are also options in the way in which fuel is returned from the rails depending on heat concerns.
An example of flexibility of these solutions may be to use a low pressure pump with a high volume to move from the fuel tank to the surge tank, but one or two lower volume but higher pressure pumps to move the fuel to the fuel rail. You may also need, in a special circumstance, to return the fuel directly to the fuel tank rather than the surge tank due to heat issues in a race application. All this is dependent on goal and limitations/requirements of a specific setup.
Fuel Cells
At the end of the day you still have a 40+ year old fuel tank design and many people opt to replace it. This can resolve both the first issue (insufficient/lack of an electric fuel pump) and the more complex issue of lacking baffles. Many racers will go the fuel cell route, fabricating a new bracket system and use a new fuel pump to match the tank. Some with very high demands will even incorporate a surge tank WITH the new fuel cell system, thus providing extra protection against starvation. It is also critical to ensure the quality and application of the fuel cells. Many fuel cells that are cheaper are not intended for use inside a road going vehicle. Many are designed specifically for off road/buggy applications and lack resilience and safety features needed to be installed inside a passenger compartment. This solution also typically results in requiring that the car now be fueled from inside the vehicle by opening the hatch and accessing the fuel cell cap directly. This is illegal in many areas and can be a major negative to a non-track vehicle.

Here are a few images of fuel cell installs in S30 cars.
 

​Intercooler Philosophies

There are several ways to address intercooling for the application, as well as the option to simply not cool the air at all. In the end it depends on the application, the preference of the owner, and the goals. You will generally get better performance and efficiency with the use of an intercooler of some kind (as well as reliability), and there are many different configurations to choose from. For simplicity sake I will only discuss the two most common configurations: V mount and front mount.
V Mount Configuration
The intercooler can be mounted behind the radiator as a V mount in the this situation easily as there is an abundance of space ahead of the engine. The benefits to this is that it uses less pipe. Less pipe is a good thing because it means there is less volume to the system and thus quicker compression of the air as less time is spent filling the space. The down side to this is that without using an air to water cooling system, the efficiency is much lower. Without being exposed to a good air source you are completely dependent on whatever the radiator fan or natural currents behind the radiator are providing for cooling. 
Picture
There is an excellent thread discussing V mount options over at hybrid Z (here).
Front Mount Configuration
Mounting the intercooler to the front of the radiator is by far the most common and efficient configuration using air to air. In this configuration you are a sacrificing a little spool time for cooling efficiency and space. By pushing the intercooler ahead of the radiator it has the best air flow access as well as being removed from the engine bay, freeing up room for other components. In the case of an SR swap, space is not as important as the cooling efficiency gain. I personally chose a front mount setup because it makes it easier to access the front of the engine and provided more cooling efficiency for long drives or drives in high temperature environments.
Picture
There are already ducting holes to either side of the radiator. These provide excellent points for passing the piping through to the intercooler and back again. With the SR having intake on the opposite side as exhaust, we do not have the issues encountered by the L28ET crowed of crossing back behind the radiator with our piping. Consider the fact that you will need to choose pipe sizes that either fit the current holes or expect to do some customizing.

Here is a general thread discussing different intercooler setups on different engine configurations over at Hybrid Z (here).
 

​Exhaust System

You are going to need a new one. Done.

You expect more information? Well here you go. Generally you want as large of an exhaust pipe as possible on a turbo charged application. There are no back pressure requirements as the turbo provides plenty in most applications, and it shouldn't end up sounding like a Honda with a fart can. The turbo will muffle/break up the noise while also deepening the note. The less pressure pushing back on the turbo (good), the faster the excess gas leaves the system (good), and the less head is held within (good). To this end, the tiny straw Datsun called an exhaust (around 1 5/8th's outside diameter) will not cut it. Not only is it too small to reasonably flow the extra exhaust from a turbo charged application, the design is completely wrong to mate to a turbo. You will likely want to take this chance to OVER size the exhaust components to allow future power increases. I went with a full 3" system knowing it would start with nearly maximum flow potential for my design, but knowing that if the volume were too high, I may be customizing the installation with additional resonators. Depending on your application/state laws/track regulations, you may also need to consider one or two catalytic converters. There are many high performance options that can be used with minimal impact to flow performance.
Turbo chargers utilize a segment of pipe called a downpipe/dump pipe to connect to the rest of the exhaust system. This pipe is typically fairly short and designed to serve a couple purposes. First, it takes the brunt of the heat produced by the turbo charger as well as having an exhaust pulling on it, so it maybe more durable than the rest of the exhaust pipe. This section of exhaust is also a prime location for welding the O2 sensor bungs.

To the right is an example of the down pipe made by McKinney Motorsports for the S30 SR20DET swap.
Picture
 

Suspension

When people do an engine swap, typically they consider the suspension only when they are adding weight. The reality is, you must consider these components when you change the weight or weight distribution of the vehicle.

The SR20DET is significantly lighter than the iron block inline 6 that it is replacing. It is also farther back in the engine bay and lower. Think of the chassis as a lever and the suspension as a fulcrum. With more weight forward and over top of he wheels, the suspension in the front of the car is supporting more weight than the back when stationary. With the replacement of the engine, you are removing weight from over top of the wheels while also distributing it more rearward. This takes both the actual weight difference as well as the distributed portion of the weight from the front end of the car. While this is a good thing for general balance, your suspension was not design for it. If you were to use the factory suspension, chances are that you would notice the front of the car riding higher (even more so than it already does) which would be causing an unintended angle to the body. The newly created angle to the rear of the car will shift even more weight to the rear wheels, accentuating the bias. If you are drag racing this may not be an issue, but if you are trying to actually drive the car, it will have negative impacts to braking and cornering. You have several options to correct this.

New springs and shocks
If you have a decent idea of what the weight change is and the load difference on the front axle of the entire setup (including all the accessories hanging off the engine), you can simply buy shorter and softer springs for the front as well with matching shocks. There is also the option of adjustable shocks, such as the Tokico Illuminas, that will let you dial in more settings as you drive.
Adjustable Coil Overs
I preface coilovers with "adjustable" because technically the suspension is already a coil over system. The difference being that most after marker coil over systems include an adjustability to ride height and spring preload. There are several options for aftermarket adjustable coilovers with a price range from $400 to nearly $2000. The most common to choices are at the extremes of the spectrum.

Whichever solution you choose, be prepared to spend some time dialing it it. It is very unlikely you will hit the perfect balance when you first install them on the car. With the non-adjustable springs it is possible that you may have to cut coils from them in order to level them properly if they are not specifically matched to the SR20DET install.
 

Brakes

You do not necessarily need to do brake upgrades since you are reducing the weight of the vehicle and should be balancing the car out with suspension. That being said, I would highly recommend it. You are adding a significant amount of power to the vehicle, but the power to weight ratio is changing even more due to the weight loss. This means that you will be accelerating at a higher rate than was expected with the worn and tired factory Z brakes. While they should stop the car if they are in good working order, the real issues relate to brake fade or lockup. Now that the front of the car is lighter and the weight moved toward the rear, you may be making it easier to under steer under braking or snap over steer on quick corrections. Having poor quality brakes in the mix does not help. Fortunately there are a lot of options, and like suspension, the price range is wide.
One of the cheapest "kit" offerings is available through Silver Mine Motors. They use a combination of parts designed for other cars as well as custom parts to create a cost effective kit. The front brake kit generally costs around $350 and provides a reasonable upgrade to the factory system, with higher end kits available. The down site to these systems is the quality of parts and their matching to one another, but they should be adequate for most street driving/mild performance driving.

Again Arizona Z Car makes the list with their extremely high quality brake kits. Their brake option uses two piece over sized rotors, stainless steel brake lines, and heavy duty Wilwood calipers. The pad depth on these kits is nearly double a factory pad for extended life and they are a much more high performance oriented kit. Of course, the price reflects this at $850 for the front and nearly $800 for the rear.
 

​Gears and things

Assuming you are not doing some incredible fabrication work to somehow use the old L series transmission on your shiny new SR20DET, you will be changing transmissions. This has several key considerations. First, you will be making a new driveline. Making a driveline is not hard, but it opens the door to all sorts of other changes. Remember, just because it's a transmission and does the same basic functions as the old one, doesn't make it the same. As an example I will reference the 5 speed transmission that comes with the S13 variant of the SR20DET. This transmission is the same one I used in my project and I have drilled the information into my head already.

To begin, lets compare the new SR transmission gear ratios (including matching differential for good measure) to that of the 4 speed transmission that came with my 1973 240Z (you can get other Z gear info here):
1972-1976 240Z (4 speed)
1st: 3.592
2nd: 2.246
3rd: 1.415
4th: 1
5th: n/a
Differential: 3.364
S13 SR20DET 5 speed
1st: 3.321
2nd: 1.902
3rd: 1.308
4th: 1
5th: .759
Differential: 4.083
​As you can see, even though both transmissions resulted in a 1:1 4th gear, nothing else about them in the same. The story is the same for the 5 speed offered on both the non-US and 77+ cars. None of them have matching gear ratios. So what does this mean? Well, for starters based on the numbers from the S13, it had a mechanical limit of 182.8 MPH, calculated with my 25.4" tires (you can find a lot of gearing calculators if you just search in Google). When I change the differential gearing to that of my factory Z diff (3.36 vs 4.083) the mechanical top speed moves to 222.2 MPH. Obviously that means I will have extremely tall gearing compared to what was initially intended for the engine and would prefer to change it out.

Differentials
This is the perfect time to choose a new differential. There are a lot of options ranging from other year Z cars to completely different manufacturers. If possible, try to obtain a limited slip differential of any kind. This will greatly improve the performance of your dusty old Z as well as giving you a chance to choose a new gear ratio to match your new transmission. There is an excellent thread on Hyrbid Z about this topic (here) and that is where the following information is from. I will quote some of the information here in case Hybrid Z links break or the thread is deleted but you should definitely read it directly. The author goes into significantly more detail about the swaps and what they entail. The most common differential swaps are the following:

R160
From the Hybrid Z thread:
The R160, R180, and R190 are straight bolt ins to any 240Z. The diffs are all the same length from the axle to the rear cover. None of these diffs require a different mustache bar.

The R160 is only a 6.3" ring gear, so it is quite small. The open diffs are susceptible to spider gear damage due to spinning one tire. Still, 510 guys have been putting this diff, especially the clutch LSD version out of mid to late 80s Subaru XT turbos, behind big motors for a long time with good results. Gary Savage reported using one of these for more than 10 years in his VG30DET 510 which had 300 ft/lbs torque at the wheels.
R180
These are the factory differential installed in most S30s. They are available in both open and clutch LSD as well as a newer version existing from more modern applications. Here is a quote from Hyrbid Z:
The R180 is the standard diff in any 240Z. The ring gear size is 7.08”. The open diffs are susceptible to spider gear damage due to spinning one tire. While we have had members run 300+ hp and 260+ lb/ft of torque through these diffs in road racing applications, they are not commonly held to be particularly strong especially when the open version is used. One more pitfall here is the 2 pinion LSD. This “street” LSD uses 2 pinions instead of 4 like the “comp” version, and it is extremely fragile. The 4 pinion LSD is much more stout and the 2 pinion should be avoided if possible. V8 and big torque cars can use this diff on the street but it is not recommended for drag racing.

Newer R180s are availabe from the 84-88 200SX and have a large K cast into the top of the housing. They can be used in the Z with some modifications. The newer diffs use a stub shaft that plugs into the diff and is retained by a circlip, and the older diffs used a bolt in stub shaft.
R190
The R190 was a diff sold through Nissan Comp back in the 70’s and maybe 80’s too. It is a good option if you can find one, but they aren’t very common. They come in a 4 pinion open diff which is much stronger than 2 pinion open, and a 2 and 4 pinion LSD version. Again, avoid the 2 pinion LSD. The H190 Detroit locker also fits in this differential, but this is a really rare combo. The Detroit locker R190 would be great for a drag racer if it could be found. It does ratchet quite harshly on cornering though.
R200 Longnose
The LONGNOSE R200 is the diff that started to appear in the 260 2+2 and continued through the 280Z and 280ZX manual, and also came standard in all Z31 cars as well. Some 200SX’s also came with this diff, and probably others. This diff is strong enough for most Hybrid Z cars, and is by far the most popular swap. All of the 280Z and ZX’s and 200SX’s came with 2 pinion open diffs. These of course suffer the same weakness as the previous diffs. 87-89 300ZX Turbos came with clutch LSD’s (CLSD). The Nissan CLSDs are all 4 pinion, and the pinion gears are very strong in the LSD. There have been complaints that the CLSD would start to slip like an open diff with more than 300 lb/ft of torque. This seems to be a problem with the clutch pack design. In order to save money it appears that the clutch packs were skimped upon, using a thick solid washer to make up a large portion of the clutch pack thickness. The result is that the tabs on the few clutches that are actually in use will break under heavy drag racing use. Some (only some) Nissan Comp diffs have a better more complete clutch pack, but how exactly one determines which have more clutches and which have fewer has yet to be determined. There has been at least one case of a racer buying a LSD from Nissan Comp and getting the shoddy clutch pack setup. Some members here have gone to the trouble to make their own clutches to replace the spacer in the LSD, which should provide a lot more strength for high torque applications. There is also a viscous LSD (VLSD) which came in the 88 SS version of the 300ZXT. This is a rare diff indeed and the spline count of the LSD unit is different than the CLSD or open diffs, so if you buy one, best to be sure you get the original CV’s with the diff.

The R200 is wider than the stock R180 diff that comes in the 240Z, but most people use the stock halfshafts when they swap this diff in. This can lead to the halfshafts bottoming out which can cause handling issues. For more info read the R200 Handling Issues link here: http://www.betamotor...cing/index.html The solution here appears to be to use the CV joints from the 300ZX Turbo when installing into a 240Z.
R200 Shortnose and R230
​The SHORTNOSE R200 and R230 are entirely different from all of the above diffs. They are very similar with regards to installation, so we’ll deal with them together. These diffs are as the name implies shorter, and so THESE ARE NOT A BOLT IN. The shorter length will require a new longer driveshaft. Most people buy this diff for the viscous LSD. While VLSD’s are not as aggressive as CLSD’s, they are fairly bulletproof, and don’t have issues with clutch packs breaking. They are also much more readily available in the junkyards than the 87-89 Z31T longnose R200 with LSD. The open diffs have 4 pinion carriers so they are also more durable than an open 2 pinion diff, but the decision to go through all the hassle just to install a 4 pinion open diff would be questionable at best.
Deciding which option is best depends greatly on your application, budget, and access to parts. Again, please go read the thread for yourself. The author JMortenson did a fantastic job compiling information.
 

Gauges

Speedometer
Obviously with a different transmission the speedometer a factory speedometer will be inaccurate, but a larger issue with this swap is that the Z speedometer operates by an entirely incompatible method. The factory speedometer uses a cable driven system, where the SR20DET transmission was designed for an electronic speedometer. There are two popular solutions to this problem.

Inline Adapter
This solution is the most common solution. A device is added between the transmission and cable for the speedometer that is able to adapt the electronic output of the transmission to the mechanical input of the speedometer. You can find a thread (here) discussing the ideas for adapting the transmission output to the speedometer on Hybrid Z. The most common solutions are a generic product like this (link here) via Summit Racing, a Cable X, or using the speed gear from a different vehicle that can correct the reading on speedometer. It will depend on which transmission you use.
GPS Speedometer
In my opinion one of the best options if you are not attached to the factory speedometer is to use a GPS unit. This allows you to skip the task of attempting to calibrate the speedometer adapter because it always calculates an accurate speed via satellite. A downside to this device is that it does not work if GPS signal is lost or power is lost. On the other hand, they are far more accurate than a mechanical speedometer, especially at high speeds and are always accurate regardless of changes to transmission/differential gearing and/or tire diameter. One of the most common devices selected for installation in the factory S30 dash that offered (here) by from Speed Hut. 
As you can see from the images to the above and right, this option also gives you access to additional features and data logging that simply is not possible with a basic speedometer.
Tachometer
There are several major differences in the tachometers for reading the L series engine vs the SR. Obviously if there are two less cylinders, the number of pulses that constitutes a revolution is different. As with speedometer there are two primary solutions to this problem: adapter or aftermarket gauge.

Inline Adapter or Rewire
This solution is less common than simply replacing the gauge. A device is added between the gauge and coil or ECU to adapt the signal for the tachometer. In a 240Z the tachometer works differently than in a later S30. There are many difficulties that arise from using this method with an SR20DET, namely that an SR typically sends the tachometer output from the ECU, not a distributor. This makes getting a signal that is readable a matter of tapping a coil and adjusting the signal to work for the tachometer. Since I did not use this method I will not address the details of the procedure.
Adjustable Tachometer
As with the speedometer, the best options if you are not attached to the factory tachometer is to use an aftermarket unit. This allows you to you to adjust the signal translation at the tachometer rather than through wiring voodoo. In my case, I also sourced the tachometer from SpeedHut (here). The tachometer I chose was a 10,000 spread. The reason I did this was to accommodate the possibility of building the engine to handle RPMs in excess of 8000. While the likely hood of this is low, it also gives me the ability to recall over revs at the gauge it's self (to see how high it spiked) if I don't notice as I'm busy driving the car.
Picture
Brought to you by LENWERX
​
All Rights Reserved