The Prologue
Every good horror story has to begin somewhere. This one begin simple enough, a guy wanting to reclaim the feeling he had from a car he owned and did stupid things with as a teenager. Little did I know, little did anyone know, that this project would potentially out last them all....
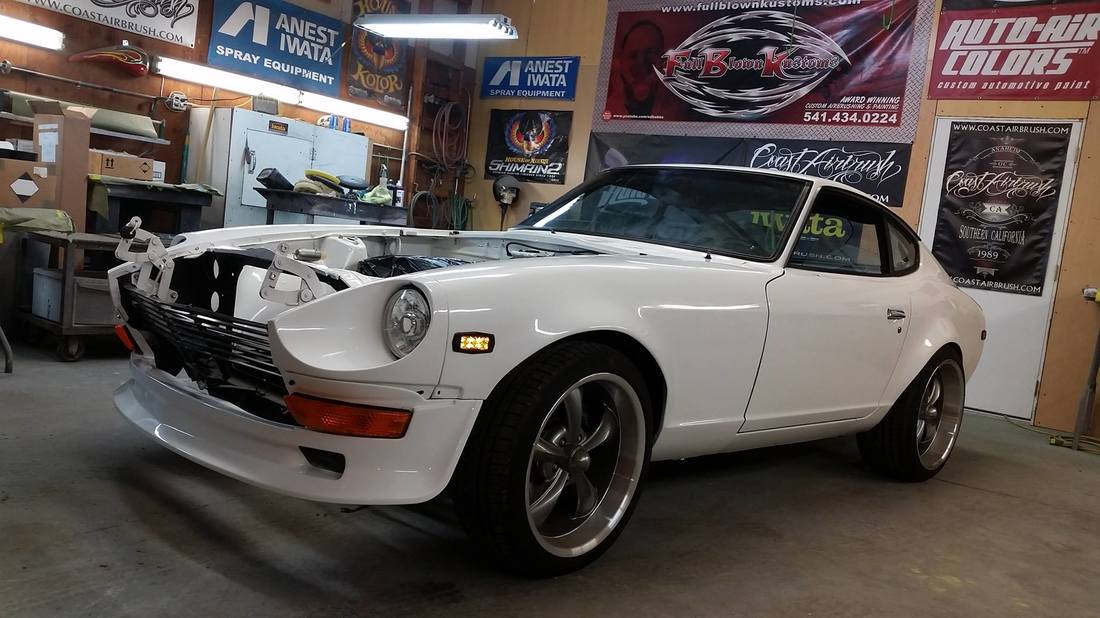
Long ago, when the earth was young, I had a 1971 Datsun 240Z. The car was a built naturally aspirated high compression L24 engine, huge flares with 295 series tires at all four corners, and virtually laying on the ground.
Research
When deciding on doing an SR20DET swap on the car I did a lot (years) of research and spending time driving cars with every swap imaginable. I ended up on the SR20DET only by a narrow margin over an F20C, and decided that I would be building another 6 cylinder car later on. For those interested, I have compiled loads of SR20DET swap information here.
The Plan
When I started my project I was trying two things I had not done before: buying off the shelf kit parts and working with a shop. Since I knew I was going to be chopping up a lot of the original parts I was looking for something that wasn't immaculate, but it good shape and wasn't a series 1 car (early production run, more rare). After sourcing the car from a Z fan about 5 hours away I started my research with on hybridz.com and zilvia.net to narrow down exactly how I wanted to approach the install. Both are fantastic resources if you are not yet familiar with them and looking to know anything about Z cars. Once I had narrowed the scope a bit to as what realistic goals maybe, I set out the first objective for the project: reasonably bullet proof installation and for the car to be nice enough that I would choose to drive it over my S2000. I knew my welding/fabrication skills as well as time would limit the quality I would be able to achieve in the time period allotted. To this end, I enlisted the help of a local shop owner and Z nut. He had a great reputation and had been around for about a decade in the area. I also purchased this car specifically for it's condition. It had been a father son project so the paint was not perfect but the car had very little rust and a good enough paint job that I could do the mechanical work and come back to the appearance at a later date. What could possibly go wrong? Turns out everything, but we will get back to that.
Every good horror story has to begin somewhere. This one begin simple enough, a guy wanting to reclaim the feeling he had from a car he owned and did stupid things with as a teenager. Little did I know, little did anyone know, that this project would potentially out last them all....
Long ago, when the earth was young, I had a 1971 Datsun 240Z. The car was a built naturally aspirated high compression L24 engine, huge flares with 295 series tires at all four corners, and virtually laying on the ground.
Research
When deciding on doing an SR20DET swap on the car I did a lot (years) of research and spending time driving cars with every swap imaginable. I ended up on the SR20DET only by a narrow margin over an F20C, and decided that I would be building another 6 cylinder car later on. For those interested, I have compiled loads of SR20DET swap information here.
The Plan
When I started my project I was trying two things I had not done before: buying off the shelf kit parts and working with a shop. Since I knew I was going to be chopping up a lot of the original parts I was looking for something that wasn't immaculate, but it good shape and wasn't a series 1 car (early production run, more rare). After sourcing the car from a Z fan about 5 hours away I started my research with on hybridz.com and zilvia.net to narrow down exactly how I wanted to approach the install. Both are fantastic resources if you are not yet familiar with them and looking to know anything about Z cars. Once I had narrowed the scope a bit to as what realistic goals maybe, I set out the first objective for the project: reasonably bullet proof installation and for the car to be nice enough that I would choose to drive it over my S2000. I knew my welding/fabrication skills as well as time would limit the quality I would be able to achieve in the time period allotted. To this end, I enlisted the help of a local shop owner and Z nut. He had a great reputation and had been around for about a decade in the area. I also purchased this car specifically for it's condition. It had been a father son project so the paint was not perfect but the car had very little rust and a good enough paint job that I could do the mechanical work and come back to the appearance at a later date. What could possibly go wrong? Turns out everything, but we will get back to that.
|
The Parts
The high level parts list was as follows:
|
|
|
A Geeky Tangent
As a result of purchasing so many parts, I actually wrote a custom piece of software to inventory parts and track costs. For those of you who keep asking what it looks like, here is a screen shot of that program. This is the parts screen. It also tracks vehicles and inventory locations and so on. For those of you interested in the tech, it's a .NET application running on custom connectivity layers, it's own two way transactional encryption system, and feeds into a custom API to a Microsoft SQL Server backend. |

|
The Heart of the Build
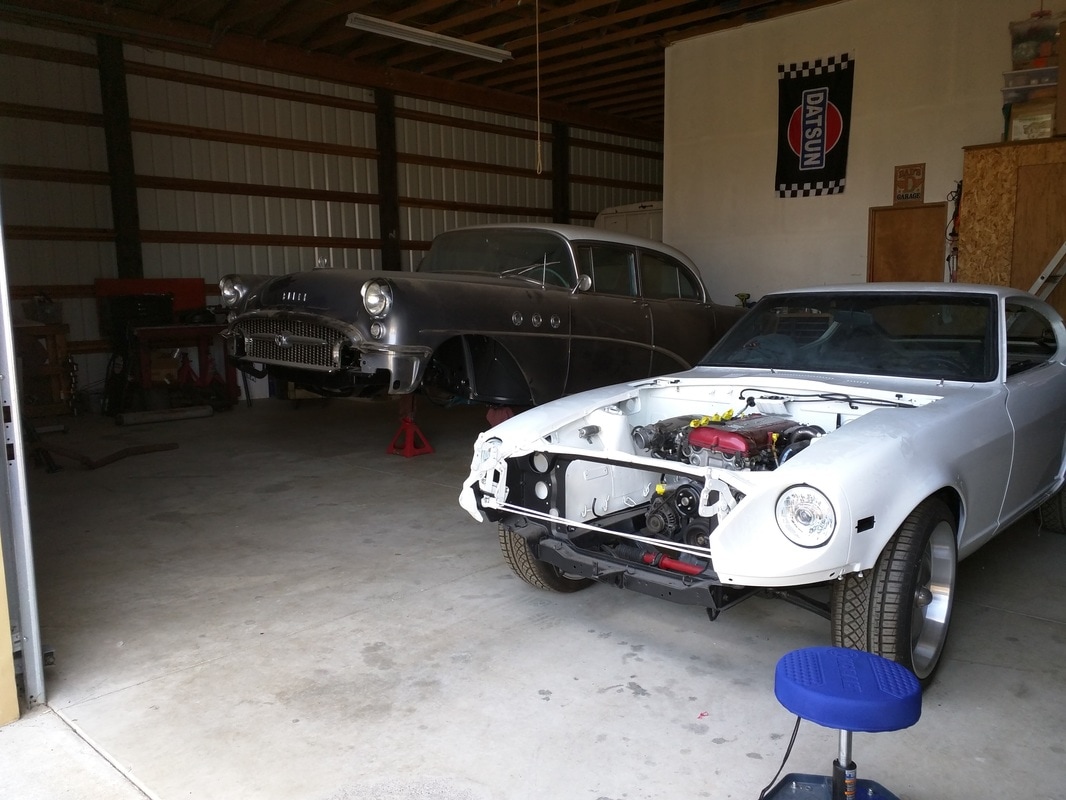
The first step in the swap is of course to source an engine. The shop owner I was working with drove down to southern California to source the S13 red top for this build. We wanted to ensure the engine we got was as healthy as possible. We were even pleasantly surprised to find a good condition ACT clutch in it.
Here are a few pictures of the engine once we got it on the stand, started doing some cleanup, and with the new intake plenum. It looks like the modifications that had been done by the previous owner(s) were done correctly which is a positive sign.
The Body
About a year into a shell game of moving the car between multiple shops to find room to finish the engine install and having the small business owner I was working with increasingly finding himself with less and less available help, I decided the only sensible thing to do would be to undercoat the whole car, powder coat everything underneath it, give it moulded in fender flares, and paint the whole thing in House of Kolor paint. That had to simplify the project.
About a year into a shell game of moving the car between multiple shops to find room to finish the engine install and having the small business owner I was working with increasingly finding himself with less and less available help, I decided the only sensible thing to do would be to undercoat the whole car, powder coat everything underneath it, give it moulded in fender flares, and paint the whole thing in House of Kolor paint. That had to simplify the project.
|
The shop I was working with took care of the undercoating of the body. Undercoating is very similar to painting in the preparation required for good adhesion. Unfortunatly, in order to get it perfect we would have had to take the car completely apart and rotisserie it, which wasn't possible with the schedule of the shop or budget. Everything possibly reachable was sanded down, washed, then several layers of undercoating were sprayed on. Heat was then placed under the body to help cure the spray due to the colder temperatures of the shop.
We elected to try a 3M product rather than the usual POR15 solution because it kept a softer setup and seems to offer a little better sound deadening. It might take damage easier, but they offer it in large spray cans for touch up. |
|
|
|
In the slide show above, the first image shows where we were coating it and some of what was waiting for final touches before it was sprayed.
While the undercoating was happening everything that could be powder coated black was. This includes the suspension components, arms, cross member, and even the brake lines. Unfortunately, there was some over-spray from painting the car that got onto the rolling gear we had reinstalled to move it to paint, so there was some redoing/clean up work after the fact. Ultimately, the underside of the car looked better than new... Well, probably, I wasn't alive when the car was new so I don't know for sure. It was the 70's, so it couldn't have been too amazing as it was the lead up to the dismal days of emissions and cutting corners on car building. |
|
The paint and body work started as "we need flares to make room for enough rubber" and turned into "paint all the things in House of Kolor and spend weeks perfectly modifying $200 in fiberglass fenders into something worth $2,000."
The flares that were purchased were the generic 240Z fiberglass flares you see everywhere. I really didn't like the look of them once we had mocked them up on the car and they had the typical fitment issues all aftermarket body pieces (especially cheap body pieces) have. |
|
My personal take on what I wanted the car to be didn't fit the aesthetic of exposed rivets and huge contrast. Of course, the only way around that is to blend them into the body of the car, which means taking down the paint, molding them in with fiberglass body filler, and repainting. This is no small feat. Blending in different material types involves many considerations about expansion characteristics, aging, curing, off-gassing, and many more nerdy things. Fortunately, the painter was just as interested in over-engineering as I was, so we thew the book them.
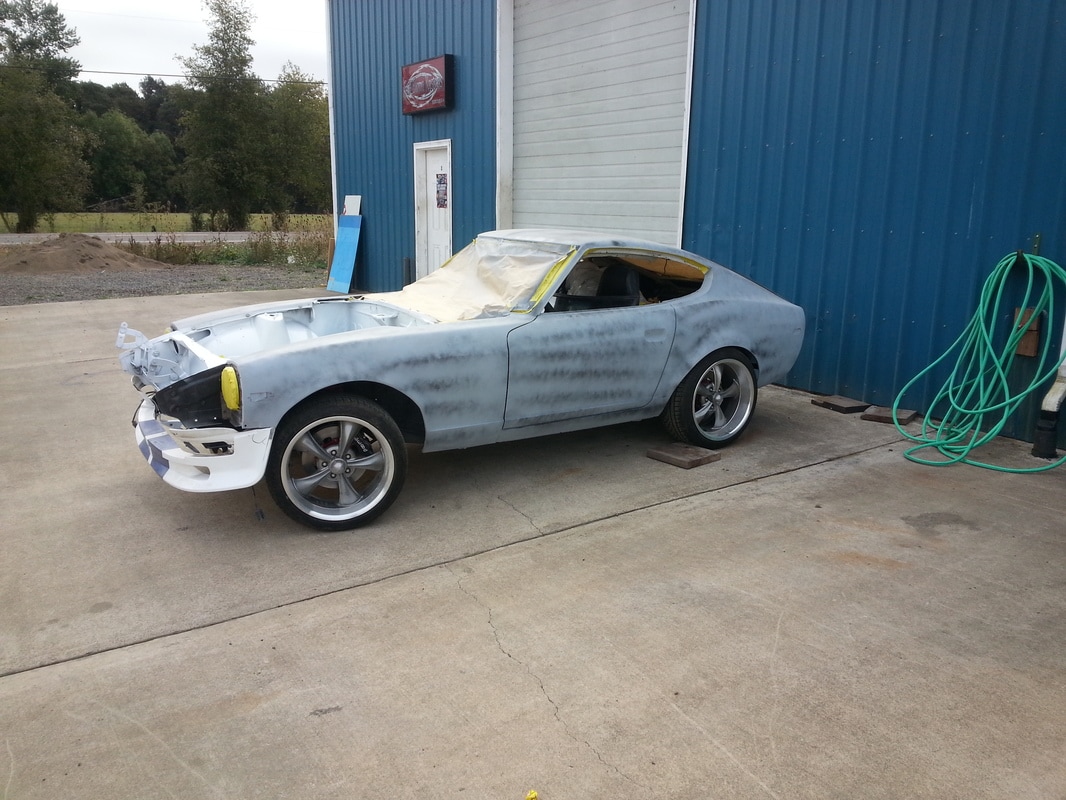
As soon as you touch paint, it's very hard to match new paint to old, and the "white" on the car when I purchased it was more of an off white that no one really liked. So, off with the paint entirely. Now, what do you find when you remove paint? Rust and repairs. It doesn't matter the car, there will be something wrong if it's a few years old. This Z had been repainted by the last owner and they had done some cosmetic changes at the same time, sealing off the vents on the hatch. They used good materials, but didn't get perfect welds that accumulated moisture and actually tried to patch a panel in the rocker that ended up more filler than metal. From above the paint, everything looked great, but the deeper we dug, the more apparent that doing all this paint and body work was a good idea.
As soon as you touch paint, it's very hard to match new paint to old, and the "white" on the car when I purchased it was more of an off white that no one really liked. So, off with the paint entirely. Now, what do you find when you remove paint? Rust and repairs. It doesn't matter the car, there will be something wrong if it's a few years old. This Z had been repainted by the last owner and they had done some cosmetic changes at the same time, sealing off the vents on the hatch. They used good materials, but didn't get perfect welds that accumulated moisture and actually tried to patch a panel in the rocker that ended up more filler than metal. From above the paint, everything looked great, but the deeper we dug, the more apparent that doing all this paint and body work was a good idea.
The Curse
At this point many of you are thinking this is an amazing project and it would be nice to be able to spend this much money on a project car. How can this possibly be a cursed car? Well, the curse is in what happens whenever I attempt to do anything that involves working with other people or schedules.
The first shop, the one who the whole story started with, had to move locations due to zoning issues after the car being there for the undercoating. Not a big deal, right? Well, between the undercoating and the moving, the car was tied up for 9 months. Once it arrived at the new location it took two months to get all the parts sorted back out and able to be worked on. Then, I was told the project would have to be placed on the back burner for a similar project, but would gain the benefit of everything learned during it's development process. Several more months go by and I decide I might as well get the paint and body work going.
|
I enlisted the services of someone I had been working with, and helping with his personal business, Ed Hubbs. He's a well known airbrush artist and good all around body and paint man. He took the project on for a reduced rate in exchange for help on his web projects. All said and done, the car spent nearly 8 months being moved around and worked on here and there. This was not so much the painters fault as a combination of bad luck (he had to give up his paint shop near me and move over and hour South) and bad timing. In the end, almost a year later, the car was back at the original shop to continue progress... or so I thought.
|
|
The owner of that shop put it back in que and said he would jump back on it just as soon as the other project was out of the way (yeah, the same project from 8 months prior) that had now become a full blown nightmare. A combination of poor expectation management by the shop owner and a vehicle owner who had absolutely no grasp on project scope or practical delivery expectations simmered into an explosive combination and indirectly pushed my project further behind.
As my car languished in que at the shop, I was buried with my own work and didn't have nearly the time needed to oversee the project. Once I had cleared my plate of my own work, I realized something, the shop owner was scaling back... a lot. He had cut way back on the vehicles he was taking in and was not available as much as he had been. This triggered a visit to check on my car. It was on this visit he told me that he was closing the shop and moving on. He said that he would honor the work on the car, but would not have a shop of his own to do it at. Oh, and that everything needed to be out of his shop in the next week or two.
As my car languished in que at the shop, I was buried with my own work and didn't have nearly the time needed to oversee the project. Once I had cleared my plate of my own work, I realized something, the shop owner was scaling back... a lot. He had cut way back on the vehicles he was taking in and was not available as much as he had been. This triggered a visit to check on my car. It was on this visit he told me that he was closing the shop and moving on. He said that he would honor the work on the car, but would not have a shop of his own to do it at. Oh, and that everything needed to be out of his shop in the next week or two.
|
In a frenzied rush we ran down to the shop, gathered all my parts and the car, and moved them back to our shop. He agreed to work on the car at our shop and it seemed as though the only real loss had been time. Time, that pesky thing that really means money, but is always hard to measure in a conversion rate. At this point, the car had been down and out over two years between paint, undercoating and powder coating, and basic parts installs. At least it was back in my shop right?
I was resolved, now that it was home I would make time to work on it, and the (former) shop owner was trying to make things right by helping get it done. |
Proving the Curse
After months of the car slowly being worked on in my shop I again became buried in work and the time the (former) shop owner had was virtually non-existent as he had taken over as a regional master tech for a large manufacturer. At this point a friend of mine asked why I didn't simply take it to a performance shop in Portland. After all, we both knew the owner (him more than myself) and he had a great reputation. Of course, that would mean a little more money, but at least it would be done.
Much debate later I called the owner of the performance shop and we discussed the project at length. He said he had just finished two other classic Z cars and would have no problem getting it in his shop and should be able to turn it around in under 6 months, sooner if I really had all the parts.
The thing about curses is, they hate being tested.
|
Initially the shop owner is going full steam ahead. He convinces me to buy an AEM v2 as he had extensive experience with them and the sensor kits that go with them. He made big plans to get the install done and be doing a full day of just tuning on the car in only a few more months... Unfortunately, after several months, the owner slows down his communication with me and prompts a visit. I discover he has lost several of his mechanics and is making up the hours himself, stretching him very thin. In an effort to be understanding I accept that my car will be delayed, but explain that if he doesn't have time to let me know and I'll come get the vehicle. A few weeks later I receive a call.
|
|
The call starts with an obviously uncomfortable shop owner telling me he has some bad news. The information was not public yet, but he was selling his business and moving into a new line of work so he could have more time with his family. The new shop owner would not have anywhere near the skill level of staff to continue my project and I would need to get the car out of his shop in the next couple weeks. To make it up to me, he was waiving the cost of work he had done and was pending invoice in exchange for the hassle. A few hundred bucks in free work? Cool. Having to grab my car trailer and deal with massive traffic into the heart of the largest city in the state again. Not fun. Seven grueling hours of crawling along in stop and go traffic later, the car as home again.
After all this, you may still be wondering why I say the car is cursed. Allow me to add some additional perspective. The first shop owner had a great reputation, had been in business for nearly 10 years when my car arrived. His business takes a dive and he folds up shop. The painter who had been running his own business for even longer, closes his doors right after I take my car back. Then, the performance shop with big name reputation, a long client list of team cars and major projects, and about 9 years on the scene sells out months after I take the car to them. Coincidence? I think not.
There are only two explanations. Option A, the car is cursed so as to never be able to be finished. An unending project which has the sole purpose to bring me financial ruin after years of desperate attempts to finish it. Option B, the car simply does not appreciate anyone but myself working on it and is destroying the lively hoods of everyone else who attempts to progress it without my involvement. I am gambling it is the latter.
Never Surrender, Never Give Up
When You Want Something Done Right...
With the return of the car from yet another shop, it became apparent that I would have to build it myself with what time I had between my two other jobs. While I enjoy doing the work myself, time is always against me.
Learning how to do work yourself is extremely fulfilling, but it is also extremely time consuming, a resource I lacked. Over a period of a year and a half, I made time to teach myself what was required for the build of a car from the ground up. Digging into the project, I started fresh and reviewed what work had been done previously. Unfortunately, the discoveries were bleak.
The engine had been stuck into the engine bay without any of the basics having been checked including timing, vacuum ports being plugged or sensors being reinstalled on the under side of manifolds. The result was that as soon as I began looking, I found myself over a weeks worth of work. Rather than pull the engine, I fixed what I could and decided I would finish the wiring. Having the wiring in place would allow me to verify the sensors were working, crank the engine to test for oil leaks, etc. After all, a professional shop had handled the engine, right?
|
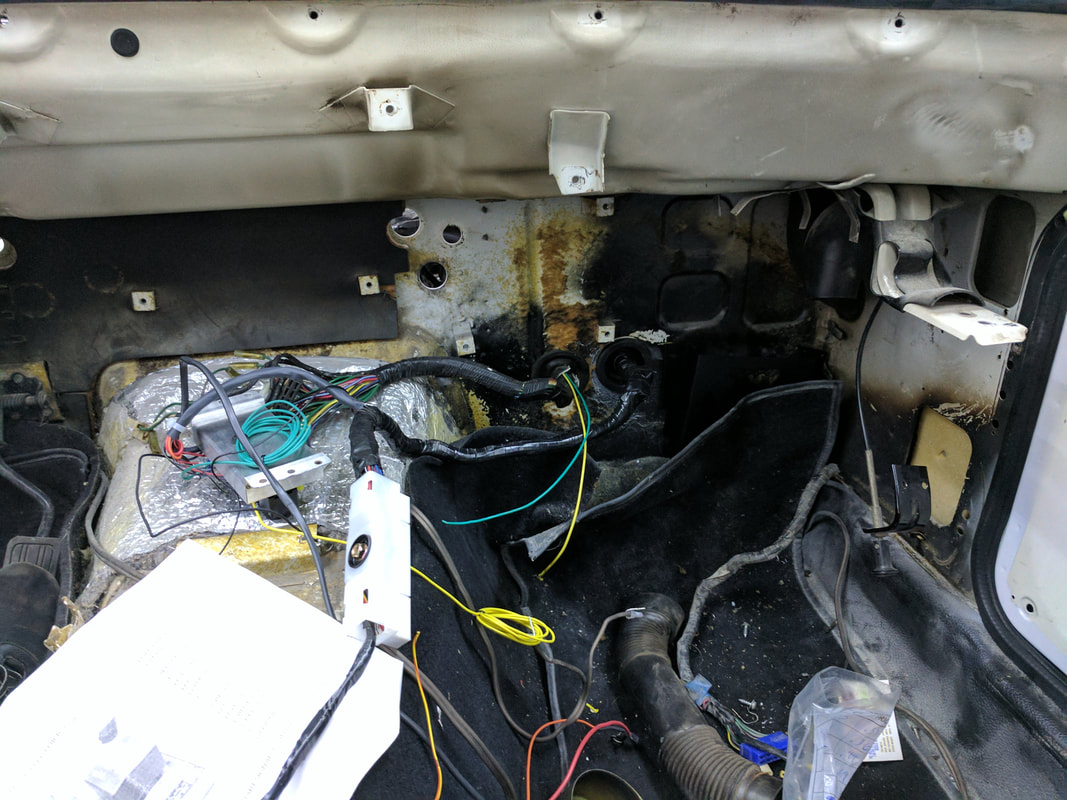
Electrical is one of my least favorite systems to work on. It is usually poorly documented, old wires are brittle and lose connection relatively easily, and if you offend the electrical gods it becomes expensive quickly.
I started working with an STL wiring harness from McKinney Motorsports, but ultimately switched to a harness from Wiring Specialties. This harness was more complete and made life much easier in integrating the AEM v2 into the main harness as plug and play. After playing with routing, there was little additional work to the main engine harness than pulling a good power source and getting the ignition from the old harness joined in. Factory 240Z wiring looms are not great for clarity, in fact, I found sources listing several different possible color combinations within the same vehicle model. |
|
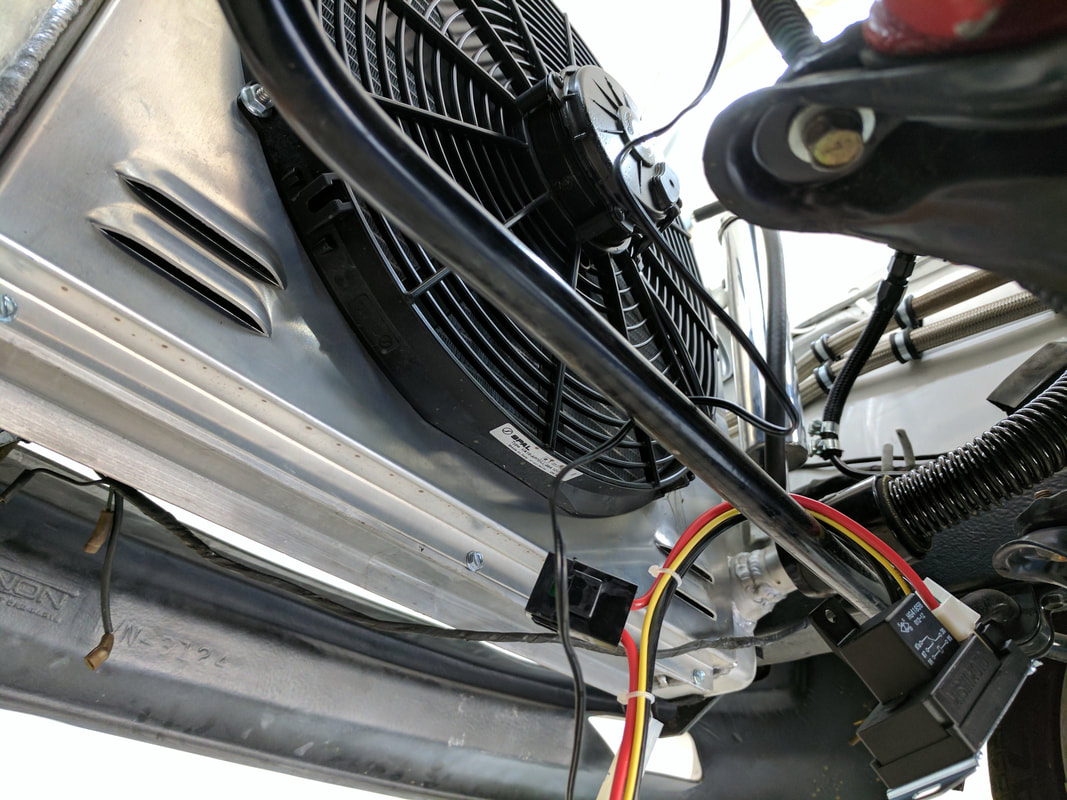
Once the main harness for the engine was integrated with the original 40+ year old harness I was keeping, I moved on to the stand alone electrical items. First up, the radiator fan. The fan I had sourced for this project was massive compared to the needs of a street car, so I had no interest in trying to incorporate this into the old wiring.
After realizing I had nothing that was a match for the plug style on the fan, I decided to cut off the plug and convert it to individual blade connectors I could heat shrink for water protection. In the event the fan would need to be replaced, it still could be easily, however, it would be less likely to suffer a failure due to corrosion or coming lose this way.
After realizing I had nothing that was a match for the plug style on the fan, I decided to cut off the plug and convert it to individual blade connectors I could heat shrink for water protection. In the event the fan would need to be replaced, it still could be easily, however, it would be less likely to suffer a failure due to corrosion or coming lose this way.
|
The electrical draw from the fan is significant and can easily result in fried wires, blown fuses, or a fire. Typically you see race cars configured with a simple switch system, allowing the fan to pull power directly from the battery and having one path for power. Personally, I dislike this solution for several reasons, the most obvious being that it requires someone knowing what the switch does.
A cheap solution I found was the Mishimoto electric fan controller. The system comes with a relay to allow the fan system to draw power directly from the battery, as well as a thermostatic switch to engage said relay. By installing the sensor in the water neck of the engine, I can have the controller engage the fans at a static value. Due to my natural level of paranoia, I did not want to put all my eggs in the basket of a $0.50 sensor either. |
Mishimoto provides an additional trigger wire on the unit that allows the user to send a signal to the relay and bypass the temperature switch system. In my case, this wire would loop back to the engine harness to provide fan control to the ECU. The AEM would then have control of when the fan engaged based on engine temperature and other data it saw via the sensors. Mishimoto's integrated temperature switch would be a secondary fail safe set some degrees higher. Should the ECU fail to trigger the system for one reason or another, the much simpler system would engage to protect the engine. Additionally, I would still have the option to wire a static power feed to the fan allowing me to run the system when the car was off or override both other systems to engage the fan should everything go wrong.
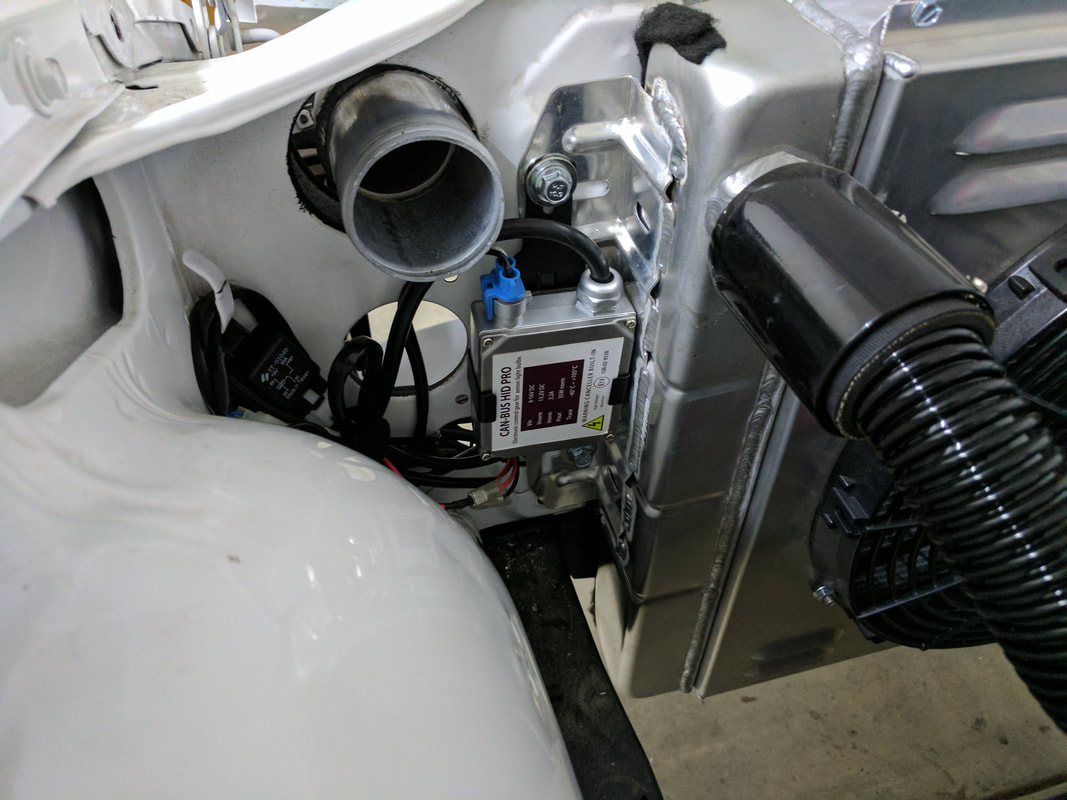
Having conquered that additional wiring, I moved on to the next standalone system: headlights. The 240Z headlight were run through the stalk on the steering column. This was a known issue as eventually it burns out the stalks and any upgrade to the headlight system greatly accelerates this unless you use a low draw system such as LEDs. The HID kit I bought was designed to pull power directly from the battery and triggered by a relay and individual ballasts for each headlight.
Having conquered that additional wiring, I moved on to the next standalone system: headlights. The 240Z headlight were run through the stalk on the steering column. This was a known issue as eventually it burns out the stalks and any upgrade to the headlight system greatly accelerates this unless you use a low draw system such as LEDs. The HID kit I bought was designed to pull power directly from the battery and triggered by a relay and individual ballasts for each headlight.
|
Even though the HID ballasts are described as being heat and water safe, I wanted them close to the nose where road water would be minimal and not directly touching a hot surface. Mounted as they are, the cradle for the unit actually allows them to float slightly away from the surfaces. This provides vibration and heat transfer protections, in theory. I then looped and installed the relays for each headlight near the ballasts for ease of location years down the road and ensured they were well connected and had dielectric grease applied (as I do with most connections under the hood).
Once installed, I pulled the trigger wire for the system from the original stalk on the column and gave the system quick test. It was illuminating. |
|
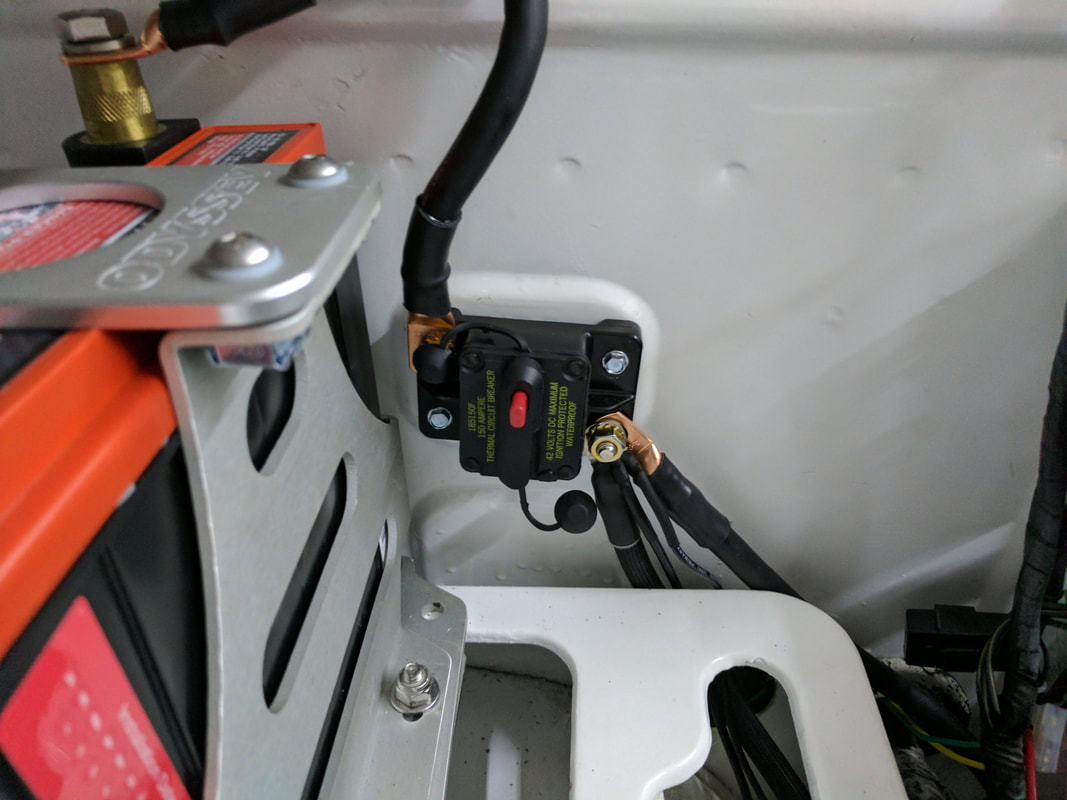
I installed a smaller battery than what would be used from the factory in the form of a Odyssey PC680. This was for weight savings as well as the fact I was not sold on leaving the battery in the engine bay. Should I choose to relocate it, I would likely hide it in a box in the spare tire well or in one of the boxes behind the seats previously used for the jack and flares.
As an extra layer of paranoid protection, I installed a weather proof 150 AMP circuit breaker on the ground side of the system. This serves to prevent battery drain when the car is parked for long periods of time (just press the red button and you're safe) as well as a piece of mind knowing that if a hard short occurs, this should pop before something explodes in flames.
As an extra layer of paranoid protection, I installed a weather proof 150 AMP circuit breaker on the ground side of the system. This serves to prevent battery drain when the car is parked for long periods of time (just press the red button and you're safe) as well as a piece of mind knowing that if a hard short occurs, this should pop before something explodes in flames.
|
To simplify the install, the circuit breaker was installed with a very short custom 2 gauge wire on one side, and a stacking of the simple circuits on the other. After some basic testing, the system seems to work well. All ground sources are far better than the factory system, power supply is not an issue to all.
Fiddling with the hot line to the starter, I accidentally tested the breaker as the line slipped off it's stud and against the bracket. A brief flash and the breaker popped off, protecting everything from damage. It almost appears as though the firewall were made to have the breaker installed in this location. The slightly raised surface I choose is almost the same size as the units footprint. |
I custom made all the main power feeds based on engineering charts of amperage capacities of wires vs length, and the demands of components. My conclusion was that I did not need to use the overly stiff, massive gauge wire many batteries used if I made the system more efficient and bought better quality wire. I also focused on having excellent connections on the wires. I'm sure a large portion of the internet will disagree with one aspect or another of the methods I used, but the result speaks for it's self. To create the wire I used copper end connections, impact crimped into clean bare copper wire, sealed with high grade electrical silicone and heat shrink around each connection. The idea was that without solder or using the traditional heated press in connections, I would avoid some of the corrosion that is introduced by the soldering process, reduce the acidity, and provide a virtually oxygen free connection with the silicone. The resulting wires are extremely strong and well attached to the connections, and show no signs of warmth when under heavy load. With the basics of the electrical circuits complete, I moved back to the engine and plumbing.
Other than having been set in place, nothing appeared to have been done to the engine. The previous shop had set the engine and transmission on the premade engine and transmission mounts and cleaned it up, but not started the real work of preparing it to run.
Other than having been set in place, nothing appeared to have been done to the engine. The previous shop had set the engine and transmission on the premade engine and transmission mounts and cleaned it up, but not started the real work of preparing it to run.
|
I set to work making a fuel system and coolant system for the engine. Intermittently I would detour to review my electrical layout to ensure there would not be conflicts and mocked up the throttle cable.
For coolant lines to the radiator, I used a generic hotrod kit which uses flexible stainless pipe and decent looking finishing ends over rubber sleeves. They had to be cut to fit, which was the most difficult part of the process to ensure they had clean cuts at correct lengths, but they served their purpose. While working on the cooling system I decided to install a different water neck on the engine to provide additional sensor/feed ports. I used one additional port for the new fan temperature sensor and another for the temperature gauge for the dash. This allowed me to ensure the temperature reading I was using to tune the fan controller was as close to what I saw on the dash as possible. Staying on the fluids side of the equation, I moved on to fuel. |
|
Fuel system design took me a few tries. To completely explain it, let use jump around the timeline of the build, shall we?
While simple in principal, I was juggling a desire to reuse the existing hard lines as much as possible with a much higher fuel demand and higher pressures. In the first design, I used 6AN line to pull from the hard fuel supply line that existed already, through a 40 micron filter, and to the back of the fuel rail. I then replaced the factory pressure regulator on the rail with an adapter to run another 6AN line from the fuel rail to the fuel pressure regulator. For the prior connections I used fuel injection hose clamps, but once I reached the fuel pressure regulator, I switched to 6AN hose fittings connected to 6AN to ORB fittings in the regulator. From the regulator, the return line was much smaller, so I stepped it down to 4AN and mated it back to the factory return line.
To test the system, I hooked my AEM 50-1005 (380lph) fuel pump to power and hung a small jug full of fuel under the car. I provided the pump a 6AN pickup line in the jug as well as sending the 4AN return into the jug. When I connected the power, the pump ran perfectly. Adjusting the regulator, I was able to maintain a solid factory pressure rating and had virtually to back pressure on the tiny return line. Let us jump into the future to my realization that this would need some revision.
The the future of projects to come, I sent the fuel tank off to a local radiator place to boil the tank and reseal it. After receiving it back the tank appeared to be in good shape, but the black paint the sprayed the outside with was cheap and rubbed off on my hands. I knew I would need to paint over it before I installed the tank permanently. Placing the tank on a small table, I lowered the car down to where I could hookup the lines to the pump and return and test the system again. This time things were not so pleasant.
|
After briefly testing the car I found that the fuel pressure was skyrocketing to the gauge maximum briefly after the car would start. I removed the return line to the tank and blew air through it and had no issue. I put air to the fuel tank return nipple and instantly had an explosion of gas spray in my face. The return tube was completely blocked.
After trying to run wire through it and trying everything I could think of to clear the connection, I decided it was pointless. Since I was going to paint the tank anyway, I decided to modify it at the same time. |
Taking the tank down and draining what little fuel was in it, I set to work removing the fuel return. This was an extremely delicate process involving all my numerous years of engineering prowess and channel locks.
|
After moments of painstaking planning, I grabbed the nipple of the return with the channel locks. Bending back and fourth for what felt like a whopping four times, the nipple was surgically removed.
Looking at the picture you can see the buildup inside the tube. With the tube broken off, I used a drill bit to extract the remaining tube and connection. By drilling directly through the connection to the tank, the remaining material on both sides of the wall were released and the small portion inside the tank fell free. With a clear path into the tank, I used a metal step bit to widen the opening until all the solder material was removed and I could install a 6AN threaded bulk head bung. These bulk head fittings use two washers to seal and an aluminum nut to hold themselves in place. Designed specifically for fuel tanks, the washers should not dissolve over time, but I'm still planning to replace it in the future. |
|
|
With surgery complete, I moved on to spraying the tank down with undercoating. I used painters tape to mask off the pickup and AN return fitting as well as the fuel filler neck.
The only prep work I did over the paint the radiator shop had sprayed was to wipe it down with alcohol. If I were expecting this tank to remain in the car for many years, I would have taken the time to strip it back down, ensure there was no minor surface rust, and properly paint the tank with a good sealing bottom coat. My plans for this tank are limited. I will likely make a completely custom tank later on when I cut the spare tire well out of the car. That will allow a flat top tank with baffles. At that time, I will convert to an in tank fuel pump setup with a surge tank and use the spare tire opening as the access hatch to the fuel pump setup. This will work for getting the project on the road. Now, back in time again to visit drive train. |
|
Previously, a shop had a driveline made to work with the R200 differential and SR20DET transmission, but they had no plan to properly fit the axles to the R200 and 240Z hubs. In a previous build they had done, they simply used later model axles from an R200 car and changed out the hubs. This provided stronger hubs than those of the 240Z, however, a the axles were (in my opinion) too long to do this in the early Z and would result in bottoming out in the differential when the car was at full squat. This was not acceptable to me.
|
|
After researching online, I decided to go with Whitehead Performance billet CV adapters to keep the 240Z hubs but use Z31 300ZX style axles. To then solve the travel distance issue, I also sourced their their shortened, hardened, axle shafts.
With these pieces I then took some old axles I had available and had them rebuilt with the new shafts. In reality, the boots for the axles were nearly as expensive as the shafts due to availability. There was a lack of information about bolt requirements for connecting the new billet adapters to the CV. Testing random hardware I had available left me with the information that the proper size was approximately M10 x 1.25 x 25mm. Obviously keeping with my overkill mentality, that meant I ordered ARP (663-1002) hex oxide bolts for the job. They installed flawlessly, although not knowing torque specs for the adapters, I errored on the side of caution. |
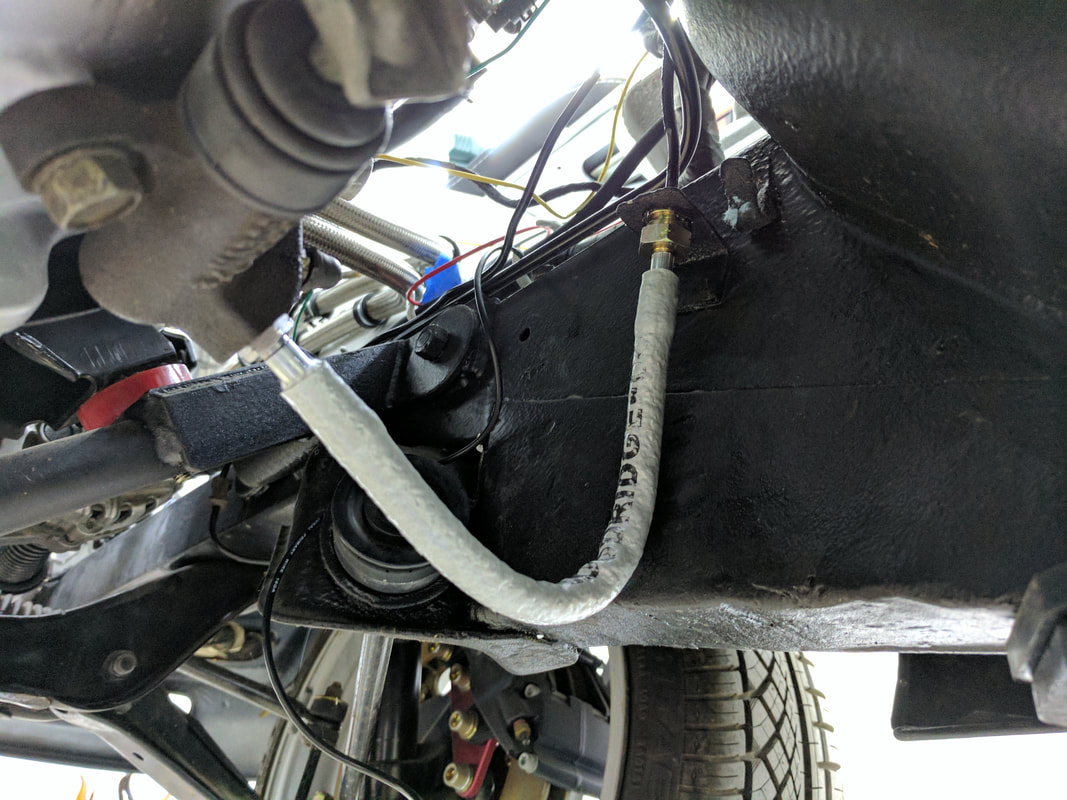
With the drive train basics attached we quickly learned that the clutch was not working. I preserved the 240Z clutch and attached it to the SR slave, so initially I was worried there was an issue with travel, pressure, etc. As it turned out, the issue was that the braided stainless line I dug up to use was just expanding and leaking like a sieve.
|
A quick visit to a few tuning sites quickly told me that the price for simple short metric flex lines was ridicules. FRSport was the best solution I found, offering a DIF line for around $30 shipped.
The new line fit well, if slightly long, but came with well crimped fittings and a nice protective coating over the line that also protects myself and parts from the abrasive stainless line. As you can see from this picture, the line could be a few inches shorter, but I believe it will be high enough to keep it's self safe for testing. The plan is to ultimately have a diffuser under the engine bay, if not the entire car. Such a plate would provide the protection needed to keep the line from snagging a branch or whatever other treats the roads may have. |
|
Moving back to the oil system, I knew I wanted to use a front mount oil cooler, but I also knew I did not want to do it purely for show as many cars are. An oil cooler need air flow to work, it needs protection from hazards, and it needs regulation of temperature. It is very possible to have too low of an oil temperature, just as it is possible to have too high of a temperature.
Temperature regulation is generally managed by thermostatic valves. I was not sure exactly how I wanted to run lines or where I wanted the filter to be located, but I knew I did not want it on the block. To this end, I purchased a 24 row oil cooler kit from Racer Parts Wholesale that included a 3/4-16UNF thermostatic sandwich plate. A thermostatic sandwich plate functions by mounting to the oil filter attachment with the oil filter attaching onto the new plate, hence the term "sandwich plate". This plate then has two ports, one allowing oil to be routed out of the filter and to the oil cooler and one to allow oil to return and continue through the engine. While a simple install, this ultimately was not going to work for my situation. The first problem was the directions the lines would need to run and the second was a lack of space to attach an oil filter relocation plate.
Temperature regulation is generally managed by thermostatic valves. I was not sure exactly how I wanted to run lines or where I wanted the filter to be located, but I knew I did not want it on the block. To this end, I purchased a 24 row oil cooler kit from Racer Parts Wholesale that included a 3/4-16UNF thermostatic sandwich plate. A thermostatic sandwich plate functions by mounting to the oil filter attachment with the oil filter attaching onto the new plate, hence the term "sandwich plate". This plate then has two ports, one allowing oil to be routed out of the filter and to the oil cooler and one to allow oil to return and continue through the engine. While a simple install, this ultimately was not going to work for my situation. The first problem was the directions the lines would need to run and the second was a lack of space to attach an oil filter relocation plate.
|
|
Version two of the system, and the system I continued to use as of getting the car running, uses a Tomei N2 oil filter block to eliminate the entire oil filter assembly from the side of the engine and replace it with two 10AN fittings. Using custom lines, I was able to route the oil from this block to a Circuit Sports oil filter relocation plate mounted to the frame rail.
Oil then flowed through the filter at it's new location, up to a Mishimoto in-line thermostat. At this point, when below 185F, the oil returns to the N2 oil filter block and into the engine. When above 185F, oil continues through the thermostat and forward to the oil cooler. At this point, placement of the oil cooler was the final consideration. |
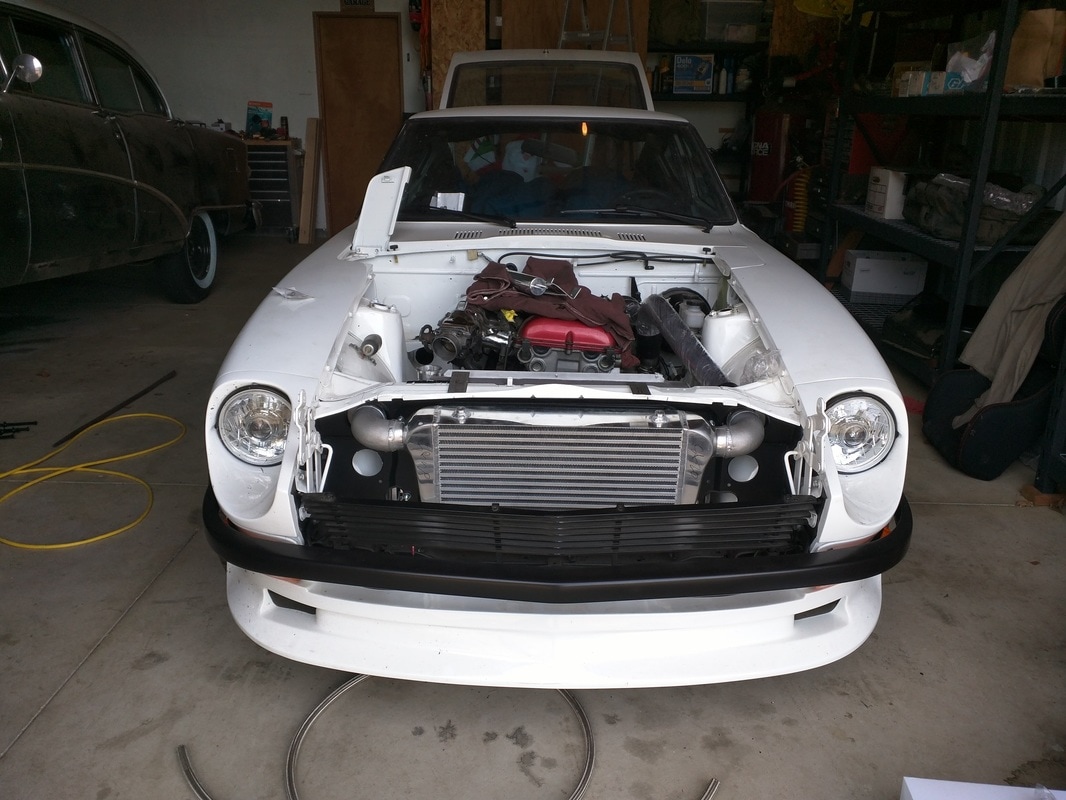
Without diving into the details of fluid dynamics and ideas for future ducting plans to optimize the lamination of air for cooling, there were really only two options that made sense. The cooler could be mounted in front of the intercooler and radiator or between the intercooler and radiator. The concept is simple, that will be my resistance stack for the air entering the bay for cooling, and somehow I need to encourage as much as possible to pass through the intercooler. The oil cooler is much smaller in surface area than the intercooler, meaning if placed directly in front, the majority of air would pass around the oil cooler rather than through. Ducting specifically through the cooler would greatly reduce the surface area of the intercooler exposed to flow. Considering these issues, placing the oil cooler between the radiator and intercooler, but not touching either one, made the most sense. This could be acieved by mounting the oil cooler to a plate supporting the intercooler, leaving the heat exchanging surfaces free floating in the space.
|
Air having passed through the intercooler will be slowed and disrupted already, reducing it's efficiency and reducing the effect the smaller oil cooler would have on the flow. Additionally, the intercooler would help to restrict available paths of the air into alignment with the oil cooler. The radiator fan would draw air through both and create a venturi effect with it's much narrower shroud opening. In theory, the benefits would be air flow and bringing the oil in the cooler up to temperature before the thermostat even opened and having the protection of the intercooler in front. After all, a hole in an intercooler is a boost leak, a hole in an oil cooler is a seized engine.
|

|
The potential down side is that the intercooler could heat the air so much that it reduced the effectiveness of the oil cooler. This is somewhat mitigated by the simple fact that the volume of oil increase and amount flowing through the system would still be a positive to the engine. If the temperature of the whole system were actually high enough to begin heating the engine, the radiator fan would be engaging and massively increasing air flow anyway.
In summary, I thought about it and screamed "SCIENCE" before fabricating up a mounting plate and moving on.
In summary, I thought about it and screamed "SCIENCE" before fabricating up a mounting plate and moving on.